前言
kaldi 是最为流行的语音识别开发工具,这次我们使用 kaldi 来进行一个唤醒词(keyword spotting)模型的训练。本篇主要涉及声学模型部分。
智能音箱、语音助手往往都需要一个唤醒词,唤醒词部分离线低功耗处理,成功唤醒后的音频数据再交给服务端进行在线识别,例如 “小爱同学” 的唤醒就是通过唤醒词模型实现的。我这里虽然简单将目标描述为“唤醒词模型”,但其实与业界一般意义上的唤醒词还不大一样,用“命令词识别”可能会更准确些。我的需求是要对一系列词汇即时唤醒,而非单个词。
需求描述:
1、在 Android 手机端运行,因此需要保证模型低功耗、内存占用相对较小;
2、支持多个命令词唤醒;
3、当有新的命令词汇列表需求时,能够快速训练适配.
方案对比,Guideboard:
Tensorflow audio recognition 官方入门文档
需要大量样本数据,每次修改词汇列表需要整个模型重训练。
Snowboy 方案
本质原理类似指纹识别,与模板进行相似度比较,不适用于词汇很多的情况。使用厂商SDK
例如百度语音唤醒,基本能够满足我们的需求,但自由度不够大。PocketSphinx
可以在一定程度上满足需求,之前有过很多尝试(详见另一篇文章),但效果不够理想。kaldi-egs-mobvoi
最近刚发现也是最近刚合入kaldi项目的,出门问问在kaldi上开源的 E2E LF-MMI recipes。还没来得及研究尝试。本文方案:
基于 kaldi aishell2 训练得到通用语音识别模型,即 LVCSR(Large Vocabulary Continuous Speech Recognition),然后修改语言模型使之应用于唤醒词。思路主要源于这篇文章: 基于kaldi训练唤醒词模型的一种方法,以及 PocketSphinx 的使用经验。
对语言模型的修改方法源于 kaldi 官方文档 online_decoding 一节
前置条件
- python2 环境
- kaldi github 下载下来,并进行了 kaldi 的环境编译
- 如果使用 aishell2 的模型,并使用 aishell 数据,先把数据手动下载下来
基本配置
将空的 aishell2 复制一份,这样之后,在自己新建的 recipe 下(我本次例子中为 kaldi_root/egs/benz_wakeup2 )应有 s5 文件夹,s5 文件夹下有以下文件:
1 | RESULTS cmd.sh conf local path.sh run.sh steps utils |
在 aishell2 recipe 中,steps 和 utils 其实都是软链接到 ../../wsj/s5 里的对应文件夹的,也就是复用了这些脚本,local 文件夹中的脚本是针对本 recipe 的一些代码,也是我们将要主要修改的地方。
为了能在单机而不是集群上跑起来,首先需要把 cmd.sh 脚本中的 queue.pl 都改为 run.pl,文件头有如下注释说明:
1 | # If you have no queueing system and want to run on a local machine, you |
接下来,run.sh 可以用来执行训练,但是不建议直接尝试训练,而是应该把里面的每步拎出来,厘清参数分别手动执行。
1 | prepare trn/dev/tst data, lexicon, lang etc |
可以从调用脚本的名字和注释可以了解到,大致分为三步:
- 准备数据和环境: prepare_all.sh
- run_gmm: 进行 gmm hmm 等训练
- run_tdnn: 进行 tdnn 模型训练
下面分别讲解:
数据准备 以及 语言模型的训练
关于训练音频语料的数据准备,有下面三个选择:
- 自己录制或搜寻语料,并修改为 aishell2 的组织格式
- 下载 aishell recipe 的免费语料,得到
data_aishell.tar.gz,约 15G,然后借助以下脚本将文件组织为 aishell2 的结构:I19tModel/hotword_detection/tools/prepare_aishell2_corpus.ipynb - 使用软链接指向已有的语料目录:
1
ln -s /home/benjamin/workspace/I19tModel/hotword_detection/kaldi/egs/aishell2/corpus corpus
语料数据准备好后,在你的 egs recipe 目录下,除了 s5 文件夹外,还会有个 corpus 文件夹,其内的数据组织为如下结构。
1 | . |
wav 文件夹下则是说话人编号的文件夹,而其内即对应的音频样本。
接下来可以直接使用 prepare_all.sh 进行语料预处理和语言模型的训练了。
进入 s5 目录,然后执行以下命令即可:
1 | local/prepare_all.sh ../corpus/train ../corpus/dev ../corpus/test |
脚本的前半部分(1、2步)会进行语料音素映射,以备后续训练;后半部分是进行语言模型的训练。
这部分脚本都不必做修改,prepare_dict.sh 值得再看一下,因为里面涉及到 aishell2 对中文词汇的处理以及对词汇外音素的选择:
1 | # download the DaCiDian from github |
aishell2 将中文文本语料使用 DaCiDian.py,先把词汇转为拼音,然后再转为音素。这样可以简化词汇的标注工作。详见该项目 github README。
训练完成后,主要是多了 s5/data 文件夹,其下包括这些文件夹:
1 | dev lang lang_test local test train |
lang 是主要语言模型训练的主要结果,train dev test 里都是些索引文件,方便后续训练的,而 local 文件夹中是刚才训练时的临时文件,里面可以看到有 DaCiDian 文件夹。
GMM-HMM 训练
然后参照run.sh中的步骤,使用run_gmm.sh进行接下来GMM-HMM的训练。不过,为了使训练出的模型能耗尽可能小,这里我们把 mfcc 特征提取中的 pitch 特征去掉,从 make_mfcc_pitch.sh 换用到 make_mfcc.sh。

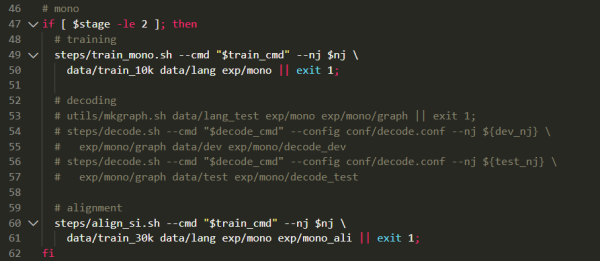
上图中圈出来的第二个部分,也可能需要根据自己数据集的数据量进行相应修改。
另外,由于去掉了 pitch 所带来的变化,还要像下面一样把 mono、tri1、tri2、tri3 训练步骤中的 decoding 部分都给注释掉,这些部分主要是用来进行测试的,对训练不会有影响。
最后,执行以下脚本开始 GMM-HMM 的训练
1 | local/run_gmm.sh --nj 30 --stage 1 |
训练完成后:
提示 local/run_gmm.sh succeeded
在 s5 文件夹下,多出了 exp 和 mfcc 目录,在 exp 下,有如下训练结果:
1 | make_mfcc mono mono_ali tri1 tri1_ali tri2 tri2_ali tri3 tri3_ali tri3_ali_dev |
进行 chain 神经网络模型的训练
前面提到,为了降低模型能耗,在 mfcc 时,我们省掉了 pitch 特征的提取。在 chain 神经网络训练时,还会重复进行一次 mfcc 特征提取,即 run_tdnn.sh 中的 stage 5 的部分,因此,这个时候也要做适当修改来略过 pitch 特征。
两种方法:
1、我们可以将原脚本中的 make_mfcc_pitch.sh 改为 make_mfcc.sh,随后注释掉 limit_feature_dim.sh 脚本等部分,把后续脚本中 ${datadir}_hires_nopitch 都改为 ${datadir}_hire 。
2、 也可以维持特征提取的部分不变,在 Stage 10 和 stage 11 中,把相关输入特征改为 ${datadir}_hires_nopitch 即可。
这里我采用后者方法。(因为我打算保留 ivector 特征,而 ivector 特征原本就是用 ${datadir}_hires_nopitch 训练的)这篇博文中还提到了去掉 ivector 特征以减少内存消耗,也值得参考下,原文有附整个脚本,注意在 stage 10 和 stage 11 中要把 ivector 作为输入的相关代码注掉。
stage 10 是将模型结构预先输出到一个 xconfig 配置文件中,我们通过修改该部分来极大缩减神经网络规模,还是主要参考自这篇博文,改后如下:
1 | if [ $stage -le 10 ]; then |
模型结构应该还有很大调优空间的,这里就先拿来主义了。
接下来正式启动训练,local/chain/run_tdnn.sh,运行到 stage 11, 也就是真正进行神经网络训练的时候,可能需要减少工作线程,如果报错请修改 stage 和 nj 参数后再继续跑下去。
到此,我们所要的声学模型部分就训练完成了。事实上,到这里也已经训练得到了一个基准的 LVCSR 模型,此时可以进行一些简单的语音识别服务了。在 s5/exp/chain/ 目录下应有新生成的相关模型文件,其中 s5/exp/chain/tdnn_1b_all_sp/final.mdl 是关键的声学模型文件,s5/exp/chain/tdnn_1b_all_sp/graph 下的 HCLG.fst 和 words.txt 则为语言模型文件和词典,有他们再加一点配置参数,就可以进行解码、识别了。
解码:
这里使用搭建 TCP server 的方式测试下在线解码能力。
官方文档其实已经有很详细的说明,在 online_decoding 的 TCP server for nnet3 online decoding 一节。
从官方文档上看到,部署 tcp server 通过 online2-tcp-nnet3-decode-faster 完成。除了 nnet3-in(声学模型) fst-in(语言模型) word-symbol-table(词典) 这三个必要参数外,还需要先准备一个 online.conf 文件,通过类似下面的命令实现:
1 | steps/online/nnet3/prepare_online_decoding.sh --add-pitch false data/lang exp/chain/extractor_all exp/chain/tdnn_1b_all_sp ./online_conf |
由于我训练时保留了 ivector 特征,命令中才会有 exp/chain/extractor_all ,这个参数是可选的,如果没用到 ivector 就可以去掉,详见 prepare_online_decoding.sh 的参数说明。
命令结束后,会在 ./online_conf 目录中多出很多文件,从online_conf/conf/online.conf 的内容可以看到,这步骤所做的事情本质是把各个 .conf 配置文件链接绑定起来,以方便后续使用。进行在线解码时就会用到这个配置文件。
不过,由于我们是基于 aishell2 训练的模型,aishell2 训练时的特征提取是以 mfcc_hires.conf 来进行的,与此时配置文件中的 mfcc.conf 中所定义的维度不同,所以需要把配置文件再手动做点修改,否则会报 类似这里 提到的错误。
把 config/mfcc_hires.conf 拷贝到 online_conf/conf/ 中,将 online_conf/conf/online.conf 中 --mfcc-config 参数的路径改为该 mfcc_hires.conf 文件的绝对路径。
接下来用以下命令启动解码的tcp服务:
1 | online2-tcp-nnet3-decode-faster \ |
--config 参数对应的是刚刚生成的配置文件, --port-num 参数对应 tcp 服务监听的端口号,其它的是解码相关参数,最后一行的三个对应对应训练得到的模型。
命令执行成功后,应有下面的log,提示在监听端口等待数据了。
1 | LOG (online2-tcp-nnet3-decode-faster[5.5.543~1-7249c]:Listen():online2-tcp-nnet3-decode-faster.cc:385) TcpServer: Listening on port: 5050 |
接下来另起一个 terminal,通过 sox 和 netcat 工具,把音频文件转为数据流并传给这个端口供其识别:
1 | sox test.wav -t raw -c 1 -b 16 -r 16k -e signed-integer - | nc localhost 5050 |
按照官方文档说法,
nc之后还应该增加-N参数,但我这里会报错没有该命令,所以暂且略过了,仍能正常测试。
结果类似如下:

结语
到此,我们已经完成了一个语音识别模型的训练和解码,就着 TCP server 的路子继续走下去,还可以实现一个通用的实时语音识别服务。不过我们的目标是在 Android 端实现命令词唤醒,所以还需要研究如何让模型在 Android 端跑起来,以及语言模型的修改。